 Xtremission LLC
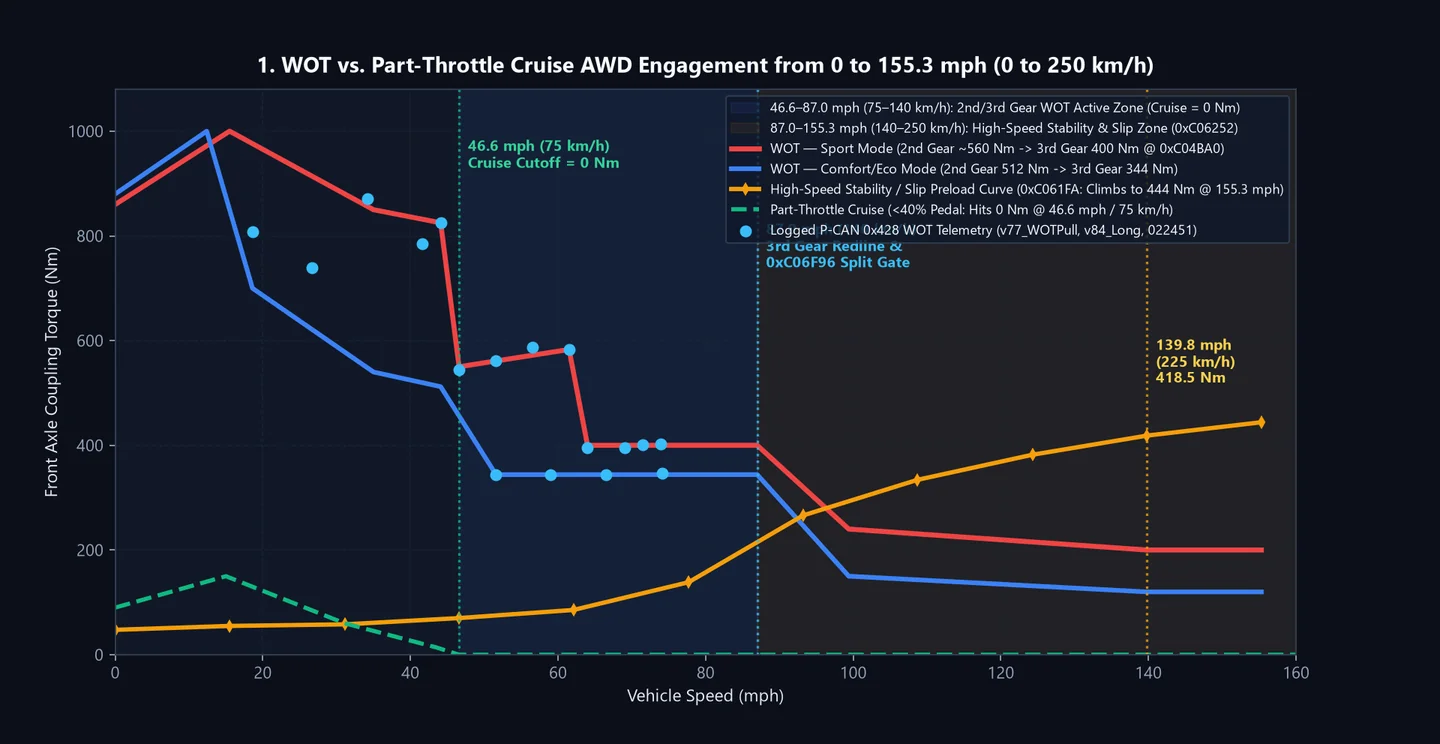
1. Why Everyone Believes It “Fully Disengages at ~45 mph” (75 km/h = 46.6 mph)
The “disengages above 45 mph” statement from Kia's technical overview is only true during part-throttle cruising (< 40–50% pedal):
- Part-Throttle Cruise Feed-Forward (
0xC04B3C): In Eco and Comfort, every pedal column from 10% to 50% drops to 0 Nm above 50 km/h (31.1 mph). - Low-Speed Preload Cutoff Curve (
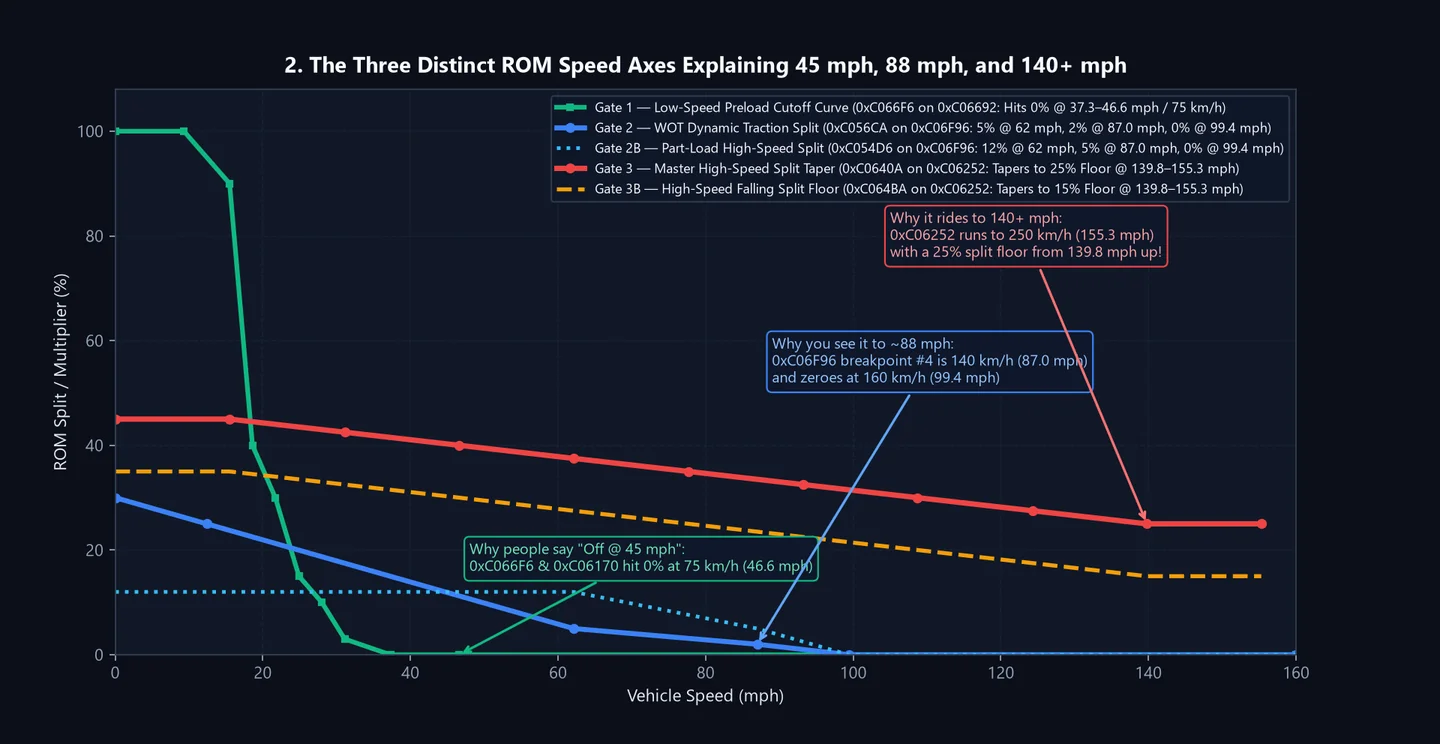
0xC066F6on axis0xC06692): Multiplies low-speed launch/cornering preload by [1.00, 1.00, 0.90, 0.40, 0.30, 0.15, 0.10, 0.03, 0.00, 0.00], hitting 0.00 (complete shutoff) at 60–75 km/h (37.3–46.6 mph). - Low-Speed Derating Curve (
0xC06170on axis0xC061A0): Drops [1.0, 1.0, 1.0, 1.0, 0.8, 0.6, 0.5, 0.5, 0.5, 0.0, 0.0, 0.0], hitting 0.00 at exactly 75.0 km/h (46.6 mph). - Confirmed in your P-CAN logs: Across more than 15,000 logged frames above 70 km/h (43.5 mph) at cruising throttle (< 40% pedal),
0x428coupling torque is literally 0 Nm (Cruise_med= 0 Nm).
2. Why You See Forward Torque Applied Up to ~88 mph (140 km/h = 87.0 mph) at WOT
When your foot is on the floor (>= 80% WOT), the AWD module does not use the cruise shutoff. Instead, two WOT pathways stay live right through 87–88 mph:
The 140–160 km/h (87.0–99.4 mph) Dynamic WOT Split Axis (0xC06F96):
- Axis
0xC06F96has 5 speed breakpoints: [0.0, 20.0, 100.0, 140.0, 160.0] km/h = [0.0, 12.4, 62.1, 87.0, 99.4] mph. - The Dynamic Traction & Transient WOT Split maps (
0xC05634..0xC056CAand0xC057F6) command [30%, 25%, 5%, 2%, 0%] at WOT across those 5 breakpoints (and0xC054D6commands [12%, 12%, 12%, 5%, 0%]). - That means the dynamic WOT split stays non-zero right through 140.0 km/h (87.0 mph) and only tapers to 0% as you approach 160.0 km/h (99.4 mph).
Clamped Last-Row WOT Feed-Forward + Gear Torque Multiplication (0xC04B3C & 0xC04BA0):
- Once vehicle speed passes the top breakpoint of the 10-point feed-forward table (75 km/h in Sport, 90 km/h in Comfort), C166 2D interpolation clamps to Row 9 (300 Nm at WOT in Comfort/Eco + 40–44 Nm high-speed preload
0xC06E90= 344 Nm, or 400 Nm at WOT in Sport0xC04BA0). - In your own P-CAN logs (
v77_WOTPull.log,v84_Long.log,panda-20261010-022451.log) with 0.0 km/h wheel slip, watch how0x428coupling torque steps down with each upshift and holds flat through 3rd gear (which redlines at ~87–88 mph):
| Speed Range | Gear | Logged Sport WOT (v77_WOTPull / 011111) | Logged Comfort WOT (v84_Long / 022451) | Governing ROM Table / Clamp |
|---|---|---|---|---|
| 31 – 44 mph (50–71 km/h) | 1st → 2nd | 785 – 871 Nm | 692 – 854 Nm | 1st/2nd Gear 45% Split (0xC0585A) |
| 46 – 62 mph (75–99 km/h) | 2nd Gear | 544 – 587 Nm | 512 Nm (flat) | 2nd Gear 40% Split (0xC0640A) / 512 Nm Clamp (0xC0732A) |
| 62 – 88 mph (100–140 km/h) | 3rd Gear | 395 – 403 Nm (flat) | 344 – 347 Nm (flat) | Clamped Row 9: Sport 400 Nm (0xC04BA0) / Comfort 300+44 Nm (0xC04B3C) |
3. Why Others See It Ride Out to 140+ mph (225–250 km/h = 139.8–155.3 mph)
Inside the ROM at 0xC061FA..0xC0653D is an 11-Point High-Speed Control Block indexed by Speed Axis 0xC06252:
Axis 0xC06252 = [0, 25, 50, 75, 100, 125, 150, 175, 200, 225, 250] km/h
= [0, 15.5, 31.1, 46.6, 62.1, 77.7, 93.2, 108.7, 124.3, 139.8, 155.3] mph
Three things happen along this 0–155.3 mph axis that keep the transfer case engaged to 140+ mph:
The Master High-Speed Split Taper (0xC0640A) Floors at 25% at 139.8 mph (225 km/h), Never 0%:
- Across [0..250 km/h],
0xC0640Atapers [45.0, 45.0, 42.5, 40.0, 37.5, 35.0, 32.5, 30.0, 27.5, 25.0, 25.0]% (and the Falling Floor0xC064BAtapers [35.0 .. 15.0, 15.0]%). - At 139.8 mph (225 km/h) and 155.3 mph (250 km/h), the high-speed split ceiling still permits 25% front torque (and a 15% floor), while the Dynamic Torque Ceiling (
0xC059EANormal /0xC05A1CSport) still allows 700 Nm to 900 Nm.
The High-Speed Stability / Slip Preload Curve (0xC061FA) Climbs With Speed Up to 444 Nm at 155.3 mph:
Look at 0xC061FA (11 × uint16 in /16 Nm) along the 0..250 km/h axis:
- 0–46.6 mph (0–75 km/h): 47.5 → 70.0 Nm
- 62.1 mph (100 km/h): 85.5 Nm
- 77.7 mph (125 km/h): 138.5 Nm
- 93.2 mph (150 km/h): 266.0 Nm
- 124.3 mph (200 km/h): 382.0 Nm
- 139.8 mph (225 km/h / ~140 mph): 418.5 Nm
- 155.3 mph (250 km/h): 444.0 Nm
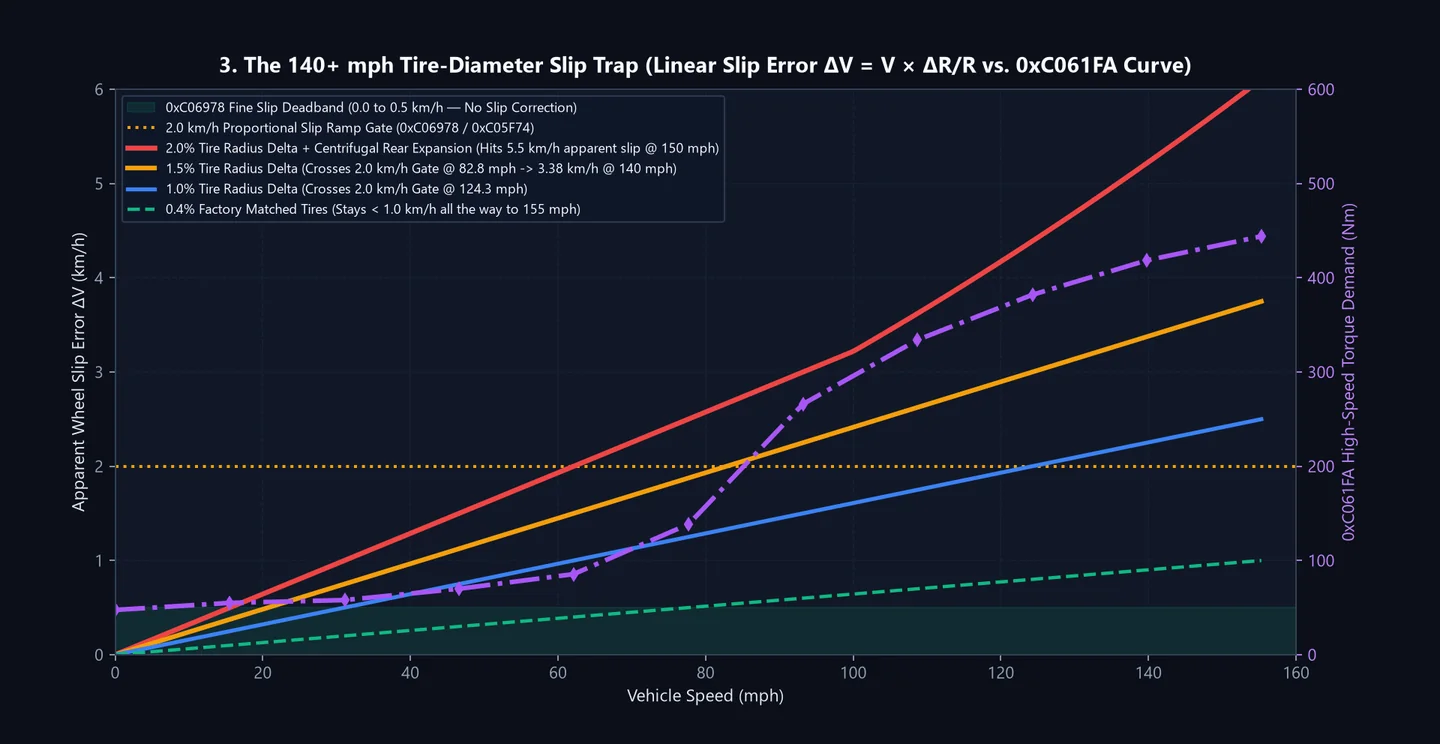
The “140+ mph Tire-Diameter Slip Trap” (Tab 3):
The AWD ECU assumes a fixed nominal tire radius (R_TIRE = 0x78 = 320 mm at 0xC04212) and measures wheel slip as a linear speed difference ΔV = Vrear − Vfront in km/h against the 0xC06978 slip axis (0.5 km/h deadband, 2.0 km/h ramp threshold).
Because ΔV = V × ΔR / R, any tiny front-to-rear rolling radius mismatch multiplies linearly with vehicle speed:
- A 1.5% rolling radius difference (common with aftermarket staggered tires, slightly worn rear tires, or centrifugal tire growth of the wider rear tires at 130–150 mph) produces only 0.7 km/h of error at 30 mph (ignored).
- At 83–88 mph (134–142 km/h), that same 1.5% mismatch crosses the 2.0 km/h slip threshold.
- At 140 mph (225 km/h), it looks like 3.4 to 4.5+ km/h of continuous rear wheelspin, forcing the high-speed slip/stability controller (
0xC061FA/0xC05F56) to lock 380–444 Nm into the front axle all the way past 140 mph.